

3 Easy Egg-Free Elimination Diet Breakfast Ideas
Here are three of my favorite egg-free breakfast options that are great to eat while on an elimination diet or whenever you have to eliminate eggs from your diet because of an allergy, sensitivity or other gut health issue.

So many of us start our day with a big plate of eggs, and if you are like me, you also have a little avocado toast too. It’s easy to get stuck in a rut of eating the same meal over and over, so it can get a little confusing about what to eat when it’s time to start an elimination diet and you are removing eggs for a short time.
In the past, I've gotten several questions on how to eat an egg-free breakfast during the 30-Day Beat Belly Bloat program, where we use the elimination diet to discover your flat belly blueprint.
There are so many other great breakfast options available that are equally delicious and filling! There is one thing we NEVER do during the program, and that is starve. We believe only in nourishing your body so you can discover foods that may be causing inflammation and preventing you from losing fat. So I want to share three of my favorite egg-free breakfast options that are great to eat while on an elimination diet.

But first, what is the elimination diet?
The Elimination Diet is an approach used by the Functional Medicine community, health practitioners, and nutritionists to figure out which foods you have a food sensitivity or food intolerance to. This is done by eating an anti-inflammatory diet, removing a specific group of foods such as corn, gluten, eggs, soy, dairy, etc. that are known to cause issues, allowing the body to remove any symptoms it may have. Later, you reintroduce these foods one at a time to note any reactions, creating a personalized eating plan.
Having this information about your individual health is important to understand so that you can eat mindfully, keep your digestive symptoms at bay, start healing your gut, and lose fat. So many benefits!
3 Easy Egg-Free Elimination Diet Breakfast Ideas:

The oatmeal breakfast bowl - my personal favorite for a hearty breakfast!
1/2 cup gluten-free rolled oats (sprouted oats are best for digestability)
cinnamon to taste
dash salt
stevia to taste
1 Tbsp nut butter (sunflower butter or almond - if not eliminating tree nuts)
1/2 serving walnuts (15g)
1 banana
2 servings grass-fed collagen
optional 1 Tbsp cacao nibs
In a bowl, add 1/2 cup rolled oats, a dash of salt and 1 cup of water. Cook oatmeal on the stove or in the microwave according to the oatmeal package. Once cooked, stir in collagen and stevia then top with additional toppings. You can also make as overnight oats to make life even easier. Get creative with it!


Berry Banana Protein Smoothie:
1-2 scoops protein powder (I love chocolate Designs for Sport: Beef Protein in chocolate (use code AWAKENED10 for 10% off using my affiliate link)
1/2-1 Tbsp apple cider vinegar
2 Tbsp. nut butter (sugar-free sunbutter or raw almond butter)
1/2 cup blueberries
1/3 cup strawberries
1/2 or whole banana
stevia to taste (I like NOW Foods brand)
1 cup unsweetened almond or coconut milk
Optional: 1 Tbsp cacao nibs
Blend well, and enjoy! Make sure to chew your smoothie to get your digestive enzymes working!
Chicken Sweet Italian Sausage and Sweet Potato:
1 organic chicken sausage link cut into slices (check for minimal ingredients, free of dairy, gluten and soy) - we like the Sabatinos Paleo Chicken sausage from Costco
1/2 sliced bell pepper
1 medium sweet potato
1/2 Tbsp avocado oil + more for sautéing or use avocado oil spray
salt and pepper to taste + add any other herbs for sautéing the bell peppers
In a small skillet, add 1/2 Tbsp of avocado oil on medium heat. Add sliced bell pepper, salt, pepper, and thyme, sauté for about a minute. Then add sliced chicken sausage and sauté in a pan until both sides are brown. Once cooked, remove from heat and add to plate.
Wash sweet potatoes, either microwave them in a dish with a little water and cover with a wet paper towel, or if you have time, bake them in the oven at 400 degrees for about 45 minutes. Once the potato is fully cooked, slice open the top and add avocado or extra virgin olive oil, salt, and pepper.
Other optional additions are sauteed mushrooms, tomatoes, butternut squash, spinach, or avocado. Get creative with it and enjoy!
So there you have it! Three of my favorite egg-free breakfasts that are sure to taste amazing plus keep you feeling full while doing the elimination diet!
One thing to remember is that elimination diets are very customizable for each individual so just be sure to check to make sure you are allowed to eat the ingredients in these meals before you start cooking!
Leave a comment below and let me know which breakfast idea is your favorite or share your favorite breakfast!

Learn How to Stop Bloat From Happening
Want to reduce inflammation and lose fat for good? Start by downloading our free guide: 5 Easy Steps to Beating Belly Bloat!
We are Chris and Amber, a husband and wife team dedicated to helping you improve your nutritional and personal fitness habits for a better lifestyle. If you have issues with bloating, inability to lose fat, brain fog, or are in need of a proven nutrition and fitness plan to get you out of a rut, then sign up for our 30-Day Beat Belly Bloat Program today!


Healthy Air Fryer Chicken Tenders (soy, dairy & gluten-free)
Are chicken tenders healthy? Not so much. Even though you get the protein benefits, they are often deep-fried. But with this healthy air fryer chicken tender recipe, you can still enjoy your tenders in a healthy way!
Coming from the south, I grew up on fried chicken but since going soy and dairy-free plus limiting my gluten intake, I haven't had much room in my life for fried chicken. Not to mention it doesn't do my waistline much good since I mostly try to eat in a way that keeps inflammation low because too much inflammation can cause weight gain and also prevent you from losing fat. I surely don’t need any help in that department!
Fried foods in general are a very high inflammatory food because of the unhealthy cooking oils used to fry the food. I’ve been eating this way for about 11 years so I really haven't missed fried foods much and on the rare instance when I do, I will have a fun meal out on the weekend and then go back to my healthy way of eating the next day.
But over the last couple years, the air fryer has made it much easier to enjoy fried-style foods but without the added fat and oil that comes with deep frying. I mostly use my air fryer to make vegetables like yellow squash during my weekly meal prep but it’s been fun to make healthier French fries and “fried” chicken tenders.
A couple months back, I found these panko style gluten-free rice crumbs from Trader Joe’s. Since then, I've been trying to perfect my gluten-free panko air fryer chicken tender recipe seasoned with everything bagel season. It’s a really simple recipe that you can really make your own depending on your personal taste since you can season any way you want!

For this recipe, I have not included exact ingredient amounts for the crumbs and seasoning because the amounts will really depend on how much chicken you are using. I normally get a bag of the frozen chicken breast tenders at Trader Joe’s and thaw out 6-12 and make them in 1-2 batches.

You don’t want your chicken to be crowded inside the air fryer so you should space them out that way they get nice and crispy. This is why I will usually do 2 batches if I am using more than 6 tenders.
Also, my air fryer is a 6 Qt. size so it can fit a good amount of food at one time but if your air fryer is smaller than that, you might have to do several batches depending how much chicken you make at once.
Gluten-Free Healthy Air Fryer Chicken Tenders
Ingredients:
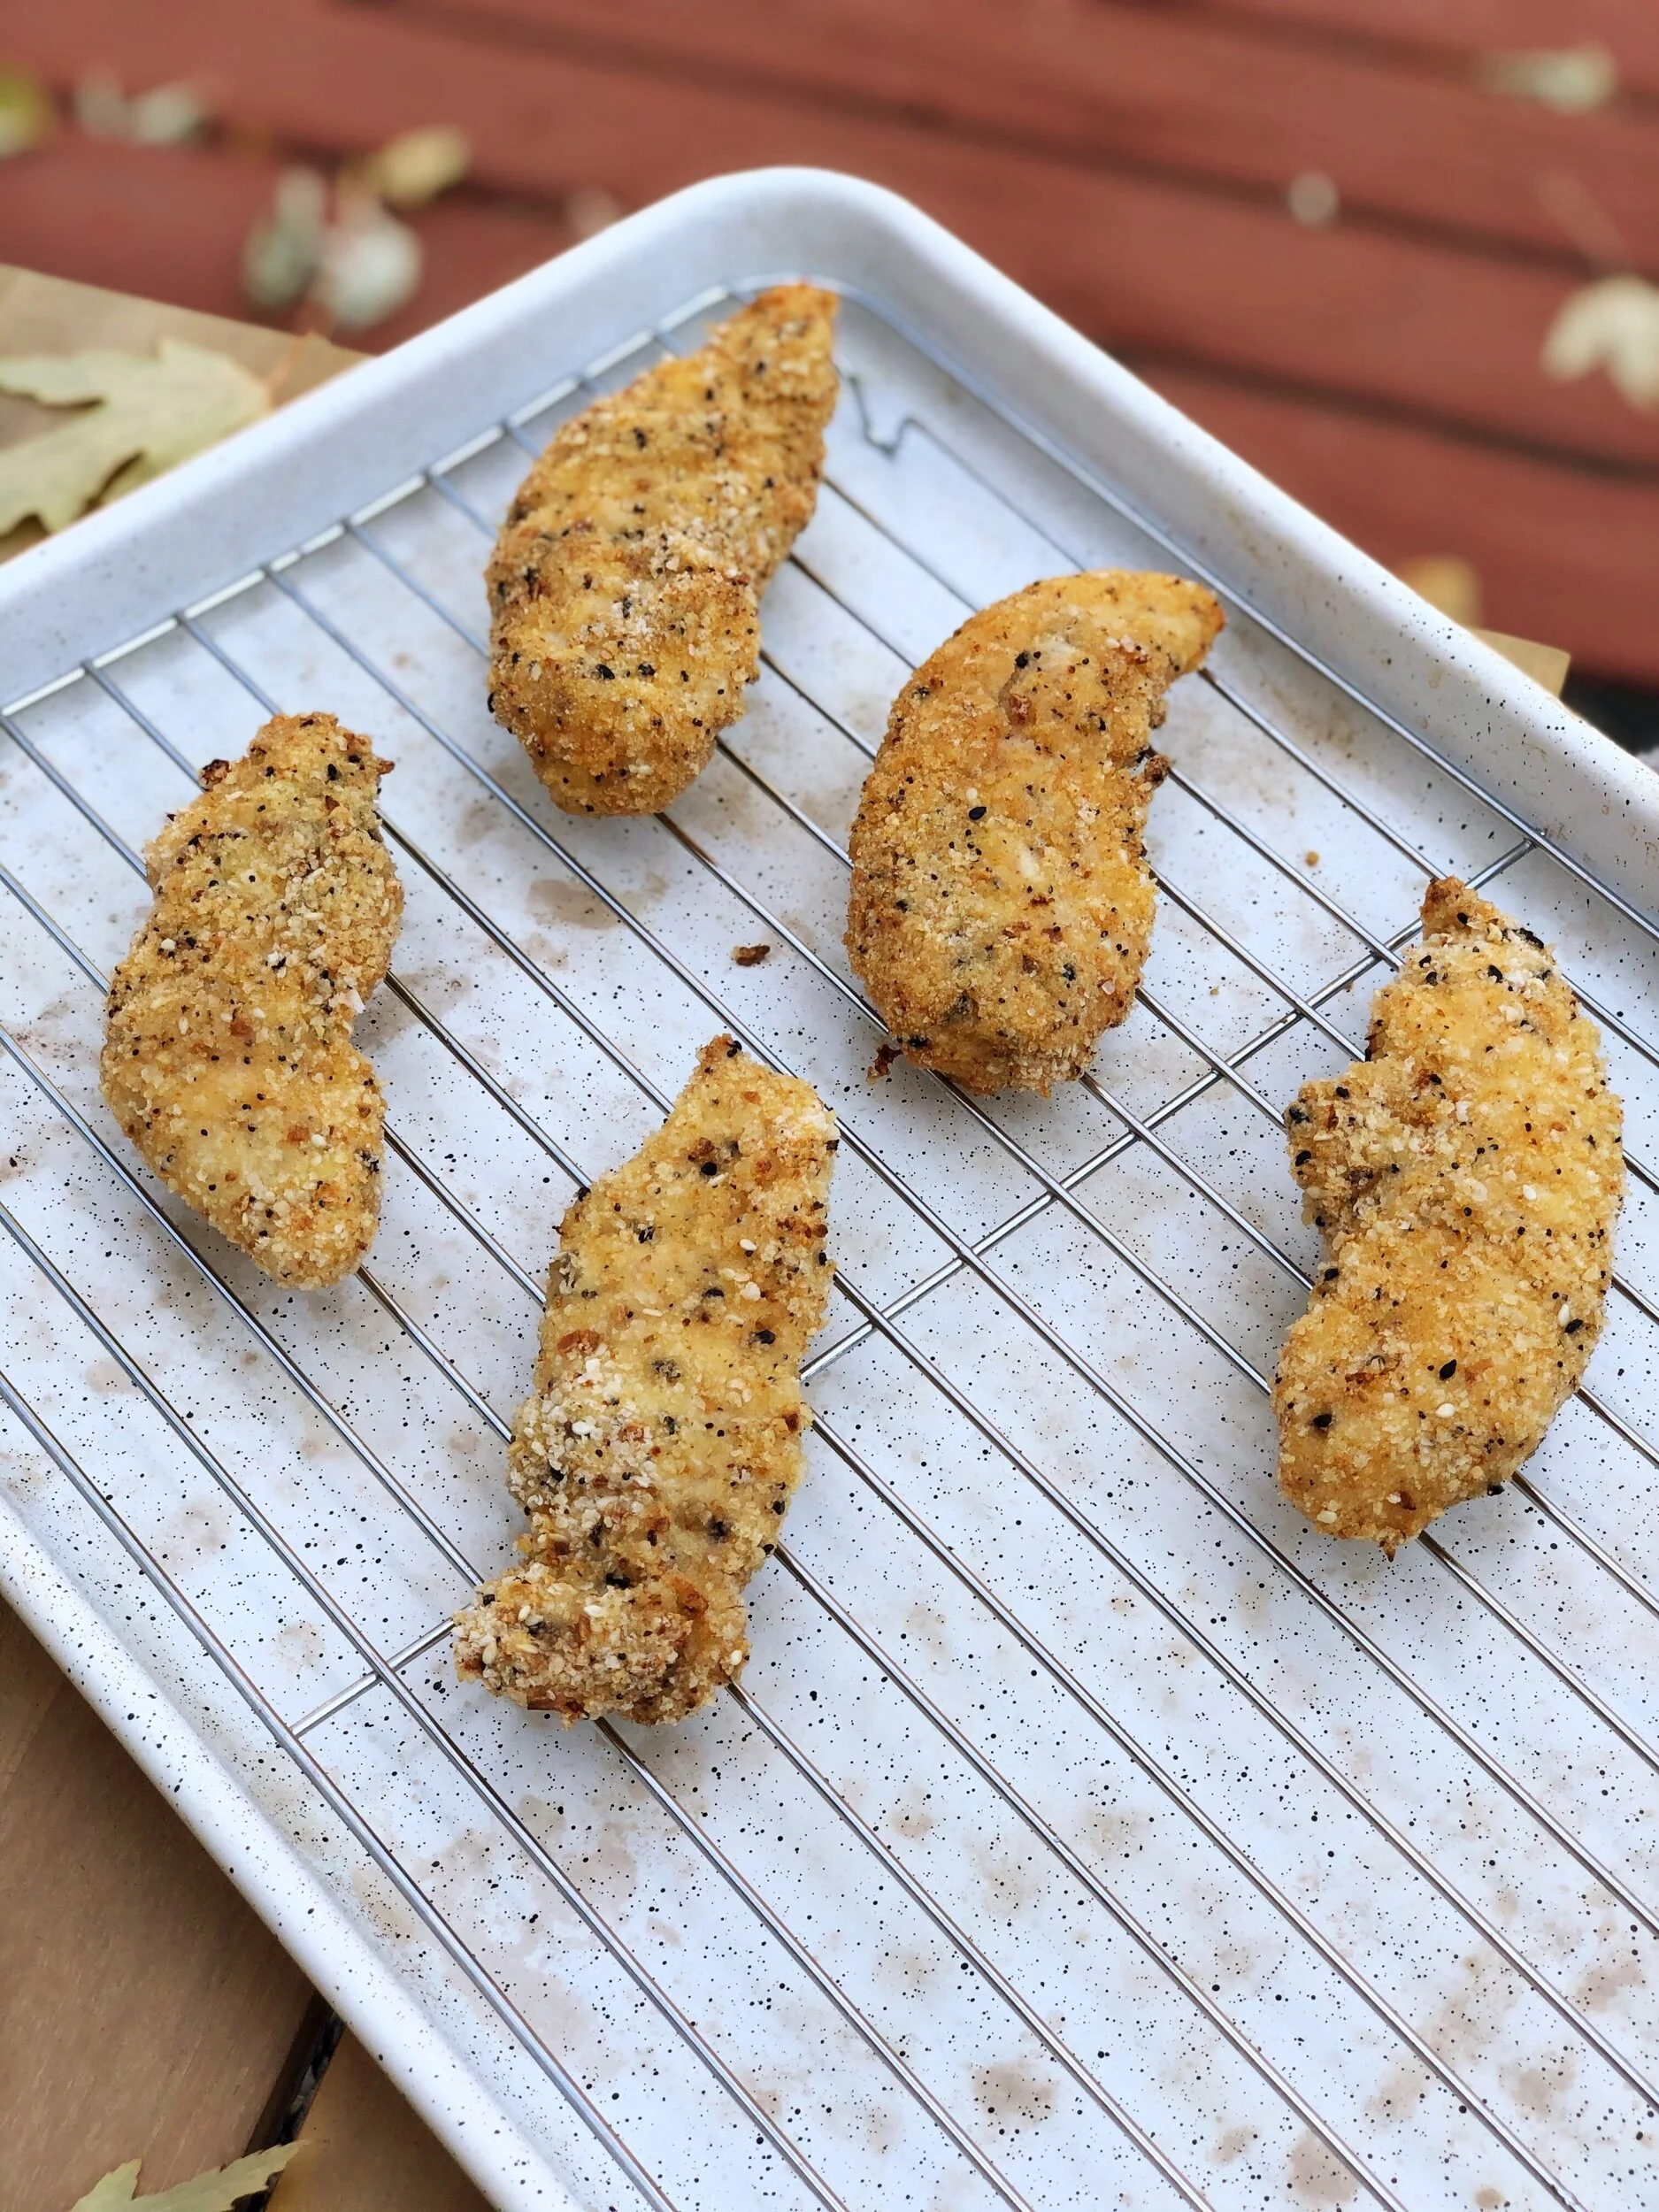
6-12 chicken breast tenders
1-2 eggs
Trader Joe’s Gluten-Free Rice Crumbs
Salt and pepper
Everything bagel seasoning
Cayanne pepper
Garlic powder
Instructions:
In a bowl, scramble 1 egg about 6 tenders or use 2 eggs if you are making 6-12 tenders.
Spray the bottom of your air fryer pan with olive or avocado oil and set to the side.
In a separate bowl, mix the TJ’s rice crumbs, garlic, cayenne pepper, everything bagel seasoning or any other seasoning combo of your choosing. Go heavy on the seasoning to make sure you have enough to cover all of your chicken!
Use either thawed chicken breast tenders or get chicken breast and cut them into strips. Salt and pepper the raw chicken, then dip chicken into scrambled egg, flip it a couple times to cover it really well.
Then dip the chicken into crumb mixture, roll several times to cover them well with the mixture.
Once coated with crumb mixture, add the chicken to the air fryer pan, salt lightly, add additional everything bagel seasoning, and spray the top of chicken lightly with olive or avocado oil.
Set air fryer to 400° and cook 5-6 minutes per side. Internal chicken should reach 165° and the outside should be crispy and lightly browned.
Get ready to enjoy some deliciously healthy, dairy-free, soy-free, gluten-free, NON-deep fried tenders! 😍
As an added bonus, when you are craving some chicken and waffles like Chris and I were this weekend, you can make this healthy version paired with some protein waffles and coconut whip topping and feel pretty dang good about yourself after!


Cranberry, Coconut, Dark Chocolate Chip Protein Balls (soy, dairy & gluten-free)
Easy soy-free, dairy-free, gluten-free cranberry, chocolate chip coconut cookie protein ball recipe.
Another no-bake protein ball recipe coming at ya! This week for our outdoor bootcamp class, I made a delicious cranberry, coconut, dairy-free dark chocolate chip, protein cookie ball recipe! These make a delicious soy, dairy and gluten-free snack!

After I made them, I put 2 protein balls into individual snack bags to make them easy to grab-and-go but you could also throw them into a container and keep them in the fridge or freezer.

Cranberry, Coconut, Dark Chocolate Chip Protein Balls - Serving size: 2 balls
Ingredients:
2 scoops Vanilla Tone It Up protein powder
1.5 cup old fashioned rolled oats
1/2 cup + 2 Tbsps Trader Joe’s Sunflower Butter (sugar-free)
1/3 cup raw, unfiltered honey
1 teaspoon cinnamon
Dash of salt
1/2 cup shredded coconut, unsweetened
1/2 cup of Enjoy Life dark chocolate chips
1/3 cup unsweetened dried cranberries
1/3 - 1/2 cup unsweetened almond milk
Instructions:
Stir all the ingredients together in a bowl until it’s well mixed. **start with 1/3 cup unsweetened almond milk and add more as needed.
Roll into balls. Put in the refrigerator for about 20 minutes and enjoy!
Store in refrigerator or freezer to eat all week long.
Below is the macro breakdown for 1 serving (2 protein balls) but your macro breakdown may be different depending on the ingredients you use.

If you are in Denver or Littleton, CO, come join in on our next outdoor Bootcamp! We would love to see you there!


Air Fryer Roasted Yellow Squash Recipe
Try this delicious air fryer yellow squash recipe! It’s easy to make and clean up is a breeze.
If you follow me on Instagram, then you know my air fryer and Instant Pot are MY JAM!!
I have pretty much only used my Gourmia 5 Qt Air Fryer to cook vegetables since I got it last December. The clean-up is super easy, the time to roast my veggies is often cut in half, and they come out perfectly cooked and flavorful every time!


Each week, I usually cook air fryer yellow squash, zucchini, green beans, and roasted carrots. I’ve also cooked some amazing roasted golden potatoes and sweet potato fries that were out of this world.
I chose to get a 5 Qt size air fryer because I knew I would be cooking large batches of food at a time and a smaller fryer just wouldn’t do the job because it would take more time and effort.
I meal prep every week but the way I usually do it now is by cooking all throughout the week rather than all in one day. So I find myself using my air fryer at least 3-4 times a week that way I always have plenty of vegetables on hand.
When I’m short on time in the morning but need veggies for my lunch, I quickly chop up squash and throw them into the air fryer to cook for 15 minutes while I am getting showering or putting on my makeup. It’s so easy to do and comes out delish every time!!
Step 1: Wash and cut my squash into about 1/2” half moon slices.

Step 2: I spray the air fryer basket lightly with avocado oil. We buy the large bottle of avocado oil from Costco for $9.99 and fill it into my Misto oil sprayer.
Step 3: Add sliced yellow squash to the basket, spray them lightly with avocado oil, and season. Shake well to make sure all the squash are seasoned. If needed, add another spritz of oil to make sure all the squash are coated.

Step 4: Close the basket. Set the air fryer to 370 degrees and set cook time to 15 minutes. Shake the basket about halfway through and spray lightly with more avocado oil if needed.
Depending on how many squash are in your basket and their thickness, you may need to add extra time in 5 minute increments until the are cooked through. Remove from basket, plate, and enjoy!!

Air Fryer Yellow Squash Recipe
Ingredients:
2-3 yellow squash depending on their size
Avocado oil spray
Everything bagel seasoning (I get from Trader Joe’s or Costco)
Thyme, salt and pepper
Instructions:
Step 1: Wash and cut squash into about 1/2” half moon slices
Step 2: Spray the air fryer basket lightly with avocado oil. We buy the large bottle of avocado oil from Costco for $9.99 and fill it into my Misto oil sprayer.
Step 3: Add sliced yellow squash to the basket, spray them lightly with avocado oil, and season with everything bagel seasoning, salt, pepper, and thyme. Shake well to make sure all the squash are seasoned. If needed, add another spritz of oil to make sure all the squash are coated.
Step 4: Close the basket. Set the air fryer to 370 degrees and set cook time to 15 minutes. Shake the basket about halfway through at the 7 minute mark and spray lightly with more oil if needed. Depending on how many squash are in your basket or their thickness, you may need to add extra time in 5 minute increments until the are cooked through.
Step 5: Remove from basket, plate, and enjoy!!
I usually enjoy my squash as a side to my Instant Pot salsa shredded chicken but there are so many other dishes you can make with this delightful side!
Leave me a comment and let me know what your favorite air fryer side dish is!


Easy Weekly Meal Prep: Instant Pot Salsa Shredded Chicken
Learn how to make this easy Instant Pot salsa shredded chicken and get some ideas on how to incorporate it into lunch and dinner dishes.

This post contains affiliate links meaning we earn a commission if you use those links.
Confession time!! I don’t think I’ve used our oven since cooking Christmas dinner (yes, we are in April now 😜) and I’m totally ok with that!

One practice that Chris and I have done for years is weekly meal prep to stay on top of our health and fitness goals. Eating healthy, soy- and dairy-free, plus managing my weight is SO much easier when I have my food prepared.
For years when my schedule was super busy, I would spend a few hours 1 day a week cooking all my food at once and putting pre-portioned meals into containers so I was prepared all week.
But now, I usually just cook large batches of protein and vegetables to keep on hand in the fridge so I can throw together a quick and delicious meal any time. Either meal prep option is great, you just have to find what method fits your lifestyle.
Having these prepped foods ready to go is especially helpful because I often practice carb cycling, meaning some days I eat low carb, higher protein, and fat, and then other days I eat regular macros of higher carb, higher protein, and lower fat.
But no matter what your eating preference is, meal prep of some sort is super beneficial because you can control what you eat and it saves you money because you aren’t eating out all of the time—bonus!!
Lately, I’ve been pretty much cooking all my protein, such as chicken, pork tenderloin, and beef brisket, in my 8 quart Instant Pot and all my veggies, like zucchini, yellow squash, and carrots, in the air fryer. Chris has even joined in on the new meal prep fun because it is so easy and delicious, and we love not having to do a ton of clean-up after.
Here are 4 examples of meals I create with Instant Pot salsa shredded chicken:
The 2 meals below are examples of similar lower-carb day meals I often make that are bursting with flavor and keep me full for several hours.
Meals 1 & 2: I add 5-6oz of salsa shredded chicken, air-fried zucchini, cauliflower, and carrots, and top with walnuts, kalamata or black olives, jalapeños, and avocado, occasionally sprinkled with “everything bagel” seasoning from either Trader Joe’s or Costco 🥑. I love creating more flavorful meals because for a while, I was starting to get into a little food rut and no one likes eating boring-tasting food.


The next two meals below are examples of meals I would eat on a regular macro day as they have more carbohydrates.
Meal 1: 5-6oz salsa shredded chicken, 1 cup of jasmine rice, coconut aminos (a delicious soy-free replacement for soy sauce), air-fried carrots, zucchini, jalapeños, and 1/4 slice of avocado.
Meal 2: Sliced organic sourdough bread topped with mashed avocado, sliced tomatoes, salsa shredded chicken, and “everything bagel” seasoning. So good!!


Quick tips when making your salsa shredded chicken
The salsa in this recipe is very subtle so you’re not stuck with eating Mexican-style meals such as tacos all week if you don’t want to. I’ve actually made many different flavored dishes with this chicken, such as soups like ramen, added it to my cauliflower gnocchi, thrown it together with veggies, and topped my avocado toast with it.
Another variation I’ve made if I don’t have salsa on hand is using marinara sauce instead and Chris has also used BBQ sauce. I would suggest with both of those substitutions that you add more sauce when cooking and a little additional water, maybe 1/3 to 1/2 cup, so your Instant Pot doesn’t flash the burn warning at you.
Instant Pot Salsa Shredded Chicken:
This recipe is so easy! Find the full recipe at the bottom of the page, below the photos!
Spray the Instant Pot lightly with avocado oil. Season both sides of your chicken breasts and add them to your Instant Pot. Pour salsa over the chicken to cover most of the top of each breast. Put the lid on, close the valve knob to the sealed position, and cook on the pressure cook setting for 13 minutes.

Once your timer goes off, let the chicken sit for about 10 minutes before turning the valve to quick release. Add chicken to a plate to shred with 2 forks or this amazing claw shredder. I will usually knock off a little bit of the salsa back into the pot before I put it on the plate to shred but it’s not necessary.

Once shredded, add it back into the Instant Pot, mix with the juices, add additional salt and pepper if desired, and then let it marinate on warm setting with the lid closed for a while. If there is too much liquid, you can also turn on the sauté function for a few minutes to evaporate some of the liquid.

When ready, eat and enjoy or add to a dish to let cool then store it in the fridge for your weekly meal prep.

Depending on your salsa, there will most likely be extra liquid in the bottom of the pot. You can choose to discard this or store it with your chicken for extra flavor. Additionally, you can drain the excess liquid and add extra salsa before eating or storing if you would like even more salsa flavor. Get ready to enjoy some deliciousness!

Instant Pot Salsa Shredded Chicken Recipe
Ingredients:
3-4 chicken breasts
1/2 - 3/4 cup salsa (enough to cover most of the top of each breast)
Salt and pepper
Taco seasoning to taste, or I will use garlic, thyme, cayenne pepper, and any other seasonings that sound good
2 Tbsps water (or 1/4 cup of water if your salsa is thick and chunky)
Instructions:
Spray the Instant Pot with a little avocado oil either Chosen brand spray (or we use a misto sprayer) to coat the bottom of the pot.
Season both sides of the chicken breasts with salt, pepper, and taco seasoning blend or any other seasonings you desire. Then add chicken breasts to your Instant Pot.
Pour about 1/2 - 3/4 cup of salsa over the chicken to cover most of the top of each breast. If salsa is very chunky, add 2 Tablespoons to 1/4 cup water to your pot so you don’t set off the burn warning.
Put the lid on, close the valve knob to the sealed position. Hit the Pressure Cook button and set it for 13 minutes.
Once the timer goes off, let the chicken sit for 10 minutes before setting the valve to quick release to let the steam out.
Open the lid and remove the chicken to a plate. Shred the chicken with 2 forks or this amazing claw shredder. Once shredded, add back into the Instant Pot, mix with the juices, and add additional salt and pepper if desired. Then, let marinate on warm setting for a while until you’re ready to eat it, or put it in a dish to store in the fridge.
*** Depending on your salsa, there will most likely be extra liquid in the bottom of the pot. You can choose to discard this or store it with your chicken for extra flavor. Additionally, you can drain the excess liquid and add extra salsa before eating or storing if you would like even more salsa flavor.
I hope you enjoy this recipe as much as we do! Let me know if you have questions in the comments and tag me on Instagram at @awakenednutrition if you give it a try!! I love hearing from you!
Learn How to Stop Bloat From Happening
Want to reduce inflammation and lose fat for good? Start by downloading our free guide: 5 Easy Steps to Beating Belly Bloat!
We are Chris and Amber, a husband and wife team dedicated to helping you improve your nutritional and personal fitness habits for a better lifestyle. If you have issues with bloating, inability to lose fat, brain fog, or are in need of a proven nutrition and fitness plan to get you out of a rut, then sign up for our 30-Day Beat Belly Bloat Program today!


What Is The Elimination Diet? Plus How You Can Use It To Makeover Your Health and Lose Fat
What Is the elimination diet? Plus how you can use it to makeover your health and lose fat.
If you haven’t realized it by now, one of mine and Chris’ favorite nutrition tools is the elimination diet. We use it as the foundation for health for most of our clients because almost every person can gain benefit from it and the results are amazing. In these videos, Chris and I discuss how the elimination diet works plus some of the many benefits you can receive from doing it even for a short period of time!

What Is The Elimination Diet? Plus How You Can Use It To Makeover Your Health and Lose Fat
Part One
Part Two
Want to learn even more about the Elimination Diet? Read more in the links below:

Learn How to Stop Bloat From Happening
Want to reduce inflammation and lose fat for good? Start by downloading our free guide: 5 Easy Steps to Beating Belly Bloat!
We are Chris and Amber, a husband and wife team dedicated to helping you improve your nutritional and personal fitness habits for a better lifestyle. If you have issues with bloating, inability to lose fat, brain fog, or are in need of a proven nutrition and fitness plan to get you out of a rut, then sign up for our 28-Day Beat Belly Bloat Program today!


5 Benefits Of Doing An Elimination Diet

When I first started on my health and fitness journey around 2009, I was the heaviest I had ever been in my life and just didn't feel good in my own skin. With the help of my new boyfriend at the time Chris, now husband, I started putting more focus on the food I ate and my fitness routine in order to lose weight.
The more I changed my eating habits from eating whatever I felt like at the moment to switching to eating healthier meals, I could finally begin to see how my body was reacting to certain food. Meal prepping and planning played a big role in changing my eating habits and being consistent!
While I was eating healthy at the time, I had doubts about dairy and thought it could be a big reason I wasn't losing as much weight as I should have been.
I then removed all dairy from my diet for 2 weeks and then added it back into my meals. I immediately had uncomfortable symptoms like gassiness and extreme bloating. It was downright embarrassing!
It was very clear that I was lactose intolerant and had probably been for quite some time BUT I wasn't able to see the symptoms because on a daily basis I was eating dairy in some form.

After my dairy epiphany, I thought to myself: No big deal, I will replace it with soy! Big mistake for SO many reasons but one being that soy is not a healthy food despite what many health websites and labels tell us. We will have to save that conversation for another day.
So I went to the Starbucks on Astor Place in NYC and ordered a large soy milk latte. My body quickly told me that I couldn't tolerate soy either as I was having the same symptoms as dairy but on a bigger and more embarrassing level.
I later confirmed with my doctor that it was a true soy allergy, but again, I had no idea for so long since I unknowingly ate soy all the time (hint: it's in most packaged foods at the grocery store). My body was in a constant state of inflammation from the food I was eating which may have been the very thing holding me back from losing fat.
Without knowing it at the time, I had done an elimination diet!
The elimination diet is now the tool I use not only with my clients but also anytime I ever have a question about a certain food that seems to be bothering me or if I ever need to do a healthy reboot when my digestion seems off balance.
So, what is the elimination diet?

The Elimination Diet is an approach used by the Functional Medicine community, health practitioners, allergists and nutritionists to figuring out which foods you have a food sensitivity, food intolerance or food allergy to.
This is done by eating an anti-inflammatory diet, removing a specific group of foods that are known to cause issues which allows the body to remove symptoms it may have. Later you will reintroduce certain planned foods back in one at a time to note any reactions creating a personalized eating plan.
Having this information about your individual health is important to understand so that you can eat mindfully, keep your digestive symptoms at bay, start healing your gut, and lose fat. So many benefits!
How does the elimination diet work?
The elimination diet works in two phases: The elimination phase and the reintroduction phase. I will explain both.
Phase one - Elimination: During the initial phase of an elimination diet, you will remove common culprits of digestive upset and common food allergens from your diet for 2-3 weeks. Most commonly you would remove some of the top 8 allergenic foods: soy, dairy, corn, egg, gluten, peanuts, tree nuts and shellfish. As well as any other food you think you may have an issue with such as nightshades, citrus fruit, yeast, legumes, etc. Please note: You should not test any foods that you believe you may have anaphylaxis reaction to.
This is so you can allow enough time for food allergens as well as other gut irritants to fully get out of your system. During this period you will naturally reduce inflammation in order to allow any symptoms to go away. You dial down your daily meals and snacks so that you are only eating real, nourishing foods that will not hurt your gut. In fact, you can begin to heal your gut with a proper elimination diet.
You will want to be strict during this phase in order to have success. Keep a list of all the foods you can and can't eat during the elimination phase so that you are very clear on which foods you need to avoid. It's very easy to forget and slip up on the foods you are used to eating.
It's important to keep meals simple and stay on track during this time so your body will be somewhat of a blankslate making it easy to figure out which foods work best for you!
Phase two - Reintroduction: Then after the 2-3 week elimination phase is over, you will enter the reintroduction phase. Gradually reintroduce the foods you removed during the initial elimination phase back into your diet one-by-one to see how your body reacts. We always suggest that our clients add back in the one food that they missed the most during the elimination phase but you can add them back in any order that you would like!
With certain food, you may notice reactions from it immediately and with others you may feel the effects a day or so later. During this phase, you will keep a food reaction journal so that you can pinpoint exactly how you are feeling both mentally and physically. Take note of any headaches, muscle aches, joint pain, constipation, gas, bloating, low energy, mood swings, fatigue, foggy thinking, etc.
Pinpointing the way these foods affect you are the key to your health success! This helps you to discover your personalized eating plan and you now know which foods to avoid in your daily life in order to avoid symptoms that may make you feel bad plus get healthier while at it!
“The food you eat can be either the safest and most powerful form of medicine or the slowest form of poison.”
An entire elimination diet can last between 1-3 months depending on how many foods you reintroduce back into your diet. The great thing about the elimination diet is that it can be tailored specifically to your personal needs with your health coach or practitioner.
In our Beat Belly Bloat program we have our clients go through a simple elimination diet that lasts only 28 days and then they have the freedom to add in extra foods if they would like to extend it. I believe 28 days is more manageable for client’s busy lives!
Many people discount the elimination diet because they think they don't have food allergies or intolerances and it won’t help them, but it goes way beyond just discovering foods you can't eat.
The benefits you can receive by doing an elimination diet are transformational in so many ways! So I wanted to share just a few with you today!

Here Are 5 Amazing Benefits of Doing an Elimination Diet:
1. Helps to uncover food sensitivities and allergies
When your body sees certain foods as a danger its natural defenses overreact creating a immune response to let you know in the form of digestive upset, IBS, constipation, hives, acne, excessive gas, bloating, wheezing, watery eyes, puffy skin, eczema, hives, etc. When you eat a food daily that you can’t tolerate, it puts your body in a constant state of inflammation and can later result in disease and weight gain. Once you uncover these foods, you can then take steps to heal your gut and later you may be able to eat that specific food again if desired.
2. Clears your skin
As I mentioned above, eczema which can come in the form of itching, dry, cracking red skin and even acne are often an immune response from certain food. What you think is just normal acne, could actually be your body telling you that diary or another food doesn't work for you and needs to be removed for a time. We’ve had clients in our program report back that their skin cleared up within days of the elimination phase after years of skin issues!
3. Start to lose fat
It has been discovered that when your body is in a constant state of inflammation, it can’t lose fat. It's hard to know what foods are inflaming your body if you are eating them often which is why elimination diets are so important to give your body a break from those foods. Also other foods like rancid cooking oils such as canola and soybean oil are also very inflammatory whether you have an issue with it or not, so during an elimination diet you can give you body a break from those foods as well.
4. Helps to fight migraine headaches
It was shown in a study that when people who suffered from frequent migraine headaches went on an elimination diet, it significantly reduced the number of migraines they experienced monthly. Rather than reaching for over-the-counter medication that only masks symptoms, you can use the elimination diet to uncover trigger foods that may be contributing to migraine headaches.
5. Helps to heal leaky gut
When you have a leaky gut, it often comes in the form of multiple food sensitivities, inflammation, bloating, weakened immune system, etc. A common reason for having a leaky gut is caused by poor diet, stress, internal and environmental toxins. Inflammation is your body’s natural defense mechanism against harmful invaders and its main purpose is to help remove those invaders and heal your body.
Leaky gut is when there’s a lot of inflammation in the gut and large holes develop in the intestinal lining allowing food, toxins and other foreign things to bypass into your bloodstream. As the undigested food or toxins pass into the bloodstream, it causes an immune response in your body and over time can lead to food sensitivities or more serious autoimmune diseases. During the elimination diet, you will remove inflammatory food and discover which ones are making you feel sick. You can then start to lower inflammation since we have removed gut irritants and make gut-healing a priority.


Learn How to Stop Bloat From Happening
Want to reduce inflammation and lose fat for good? Start by downloading our free guide: 5 Easy Steps to Beating Belly Bloat!
We are Chris and Amber, a husband and wife team dedicated to helping you improve your nutritional and personal fitness habits for a better lifestyle. If you have issues with bloating, inability to lose fat, brain fog, or are in need of a proven nutrition and fitness plan to get you out of a rut, then sign up for our 28-Day Beat Belly Bloat Program today!

Disclaimer: I earn a small commission if you use some of the highlighted links to purchase products mentioned in this blog/website. I recommend only products that I would use my own home or that I would recommend to clients.
Amazon Disclaimer: We are a participant in the Amazon Services LLC Associates Program, an affiliate advertising program designed to provide a means for us to earn fees by linking to Amazon.com and affiliated sites.

How To Start Meal Prepping Like a Pro

One of the most important tools that keeps our clients on track for our upcoming Beat Belly Bloat program is WEEKLY MEAL PREP!
Chris and I know firsthand how important meal prep is for staying on track with our personal health goals whether it be muscle building, weight loss or just avoiding inflammatory foods that cause belly bloat, brain fog, and a host of other health issues. We meal prep weekly and it has become a habit for us over the years!
Meal prep gives you complete control over the ingredients in your food!
During the first phase of the Beat Belly Bloat program, we eliminate some of the top allergens: soy, dairy, corn, gluten, eggs, and peanuts as well as other inflammatory foods like canola and soybean oil. This gives your body time to rest and de-bloat.
Once you have a clean slate, you can start re-introducing those foods back in one at a time to discover how your body reacts to each food, creating your flat belly blueprint.
The elimination diet is such a simple yet extremely POWERFUL tool that you can use to not only discover foods that don't work for you, but also help you to release body fat and inflammation.
It is a program that is used by functional medicine doctors all over the world to help clients regain their health and life. It's amazing!
Here are some of my favorite meal prepping tips that you can use whether you are in the program or just want to start implementing weekly meal prepping.

Time Saving Meal Prep Tips:
Plan Ahead. This is essential. Sitting down for a half hour over the weekend to plan out your weekly menu will save you time and money. Pick out 3-4 recipes for the week and make sure to read through them so you can figure out what ingredients you have on hand and the ones you need to buy.
Pre Prep in your free time. Look at your meal plan and recipes and see what can be done ahead of time, in the morning or on the weekend. Pre-soak, defrost, slow cook, pre-chop anything and everything. Chop a lot of garlic at once and keep stored in a sealed container to add to recipes throughout the week.
Use Kitchen Shears. Great for trimming herbs, cutting up or trimming fat off chicken breast, and quickly opening bags, these can be a major time saver in the kitchen.
Be productive while you cook! Cooking doesn't have to consume all your time. While food is cooking, turn on your favorite podcast, listen to an audiobook, do other household chores, check emails or watch your favorite Netflix show or YouTube channel.
Create your meal plan with food you already have on hand. Save time and money by working with what you have in your freezer, pantry and fridge already. Keeping your meals as simple as possible will save you time and can still taste super delicious!
Clean-up while you cook. As you cook, start soaking and washing dishes or load your dishwasher. Wipe up messes on the counter and put away anything that isn't being used. This way you don't get overwhelmed with a big clean up job at the very end.
Cook While You’re Cooking. Have the oven on already? Throw in a tray of kale to make kale chip snacks for the next day or roast your favorite vegetables such as yellow squash, zucchini, mushrooms, and onion - my faves!!
Take a few extra minutes to throw your complete meals into containers. Once all your cooking is done, throw your meals into little grab and go containers. This will save you tons of time during the week as you won't even need to think twice about making your lunch each day. Plus this also makes it easy to throw meals into the freezer if you don't get to eat them during the week.
Pre-prep and freeze your protein smoothie ingredients. Wash, trim and freeze your fruit or better yet, buy organic frozen fruit. Then place each days fruit smoothie portions plus your protein powder, seeds, greens, and any other ingredients you desire into individual jars or ziplock baggies to freeze. Each morning you can throw them into the blender, add almond or coconut milk, and GO!
Pull out the crockpot for no fuss meals. You can make super easy meals overnight or while you are out for the day. Just chop up a bunch of veggies like onion, celery, and potatoes, add your protein of choice and seasonings, then let it cook on low for about 8 hours or on high for 3-4 hours. This will literally save you so much time and result in a delicious tasting meal. Try this easy crockpot beef stew recipe to get started!
Use parchment paper to help keep food from sticking to the pan or dish. Sometimes vegetables and meats will stick to pans when cooking and can create a real mess to clean up. Line your pans with unbleached parchment paper to prevent sticking and make clean up a breeze. It is also helpful to place parchment paper over the top of dishes, like baked chicken, while cooking to avoid splattering and to help lock in the juices.
Find more meal prepping tips on big batch cooking here in this post How to Weekly Meal Prep The Easy Way

6 Easy Meal Prepping Tips To Live By:
Steaming, sautéing, roasting, grilling and baking are healthy, easy, and quick ways to cook food.
Keep it simple! Don’t allow what you don’t know make you feel overwhelmed. Combine a healthy protein, vegetables, grain or potato, and a healthy source of fat to create a balanced meal.
Eat foods that are easy to digest. My rule of thumb is to keep it to 5 ingredients or less. Simple ingredients mean more energy, less bloating, and more nourishment.
Try a few of the wonderful recipes in our meal plan. Remember, if you do not like a recipe then get creative and modify any recipe to your liking.
Adding salsa, hot sauce, coconut aminos, tahini, garlic, or other healthy condiments can make any food taste fabulous.
Prepare your meals in larger quantities so you can have leftovers and freeze portions for an easy grab and reheat option later.
You can prepare soups and freeze them.
Make a large batch of vegetables, protein, potatoes, and white or brown rice for the week.
Put together simple salads and have them ready to go in BPA-free plastic containers or glass Mason jars, with the dressing stored separately.

Learn How to Stop Bloat From Happening
Want to reduce inflammation and lose fat for good? Start by downloading our free guide: 5 Easy Steps to Beating Belly Bloat!
We are Chris and Amber, a husband and wife team dedicated to helping you improve your nutritional and personal fitness habits for a better lifestyle. If you have issues with bloating, inability to lose fat, brain fog, or are in need of a proven nutrition and fitness plan to get you out of a rut, then sign up for our 28-Day Beat Belly Bloat Program today!

Disclaimer: I earn a small commission if you use some of the highlighted links to purchase products mentioned in this blog/website. I recommend only products that I would use my own home or that I would recommend to clients.
Amazon Disclaimer: We are a participant in the Amazon Services LLC Associates Program, an affiliate advertising program designed to provide a means for us to earn fees by linking to Amazon.com and affiliated sites.